Carts & Orders
Payment Gateways
Configuration
You can configure the available payment gateways in your cargo.php config file.
Gateways often have things like API keys, or other options you may need to provide, which you can do in the config array.
// config/statamic/cargo.php
'payments' => [
'gateways' => [
'dummy' => [
//
],
// 'stripe' => [
// 'key' => env('STRIPE_KEY'),
// 'secret' => env('STRIPE_SECRET'),
// 'webhook_secret' => env('STRIPE_WEBHOOK_SECRET'),
// ],
// 'mollie' => [
// 'api_key' => env('MOLLIE_KEY'),
// 'profile_id' => env('MOLLIE_PROFILE_ID'),
// ],
],
],
Sensitive values should be stored in your .env file, which should be ignored by Git.
Dummy
Like the name suggests, the Dummy payment gateway exists to make it easy to get up and running with Cargo, without fussing about setting up and configuring a payment gateway.
Payment Form
You don't need to copy this into your project if you're using the built-in checkout flow, as you'll already have it.
To use the Dummy gateway, copy and paste this template into your checkout flow:
<form action="{{ checkout_url }}" method="POST">
<div class="grid grid-cols-2 gap-4 mb-4">
<input type="text" name="cardholder" placeholder="Name on Card" value="{{ cart:customer:name }}" required>
<input type="text" name="card_number" placeholder="Card Number" value="4242 4242 4242 4242" required>
<input type="text" name="card_expiry" placeholder="Expiry" value="{{ now format="m" }}/{{ now format="y" | add:1 }}" required>
<input type="text" name="card_cvc" placeholder="CVC" value="123" required>
</div>
<button>Pay Now</button>
</form>
<form action="{{ $checkout_url }}" method="POST">
<div class="grid grid-cols-2 gap-4 mb-4">
<input type="text" name="cardholder" placeholder="Name on Card" value="{{ Statamic::tag('cart:customer:name') }}" required>
<input type="text" name="card_number" placeholder="Card Number" value="4242 4242 4242 4242" required>
<input type="text" name="card_expiry" placeholder="Expiry" value="{{ now()->format('m') }}/{{ now()->addYear()->format('m') }}" required>
<input type="text" name="card_cvc" placeholder="CVC" value="123" required>
</div>
<button>Pay Now</button>
</form>
Stripe
Payment Form
You don't need to copy this into your project if you're using the built-in checkout flow, as you'll already have it.
To use the Stripe gateway, copy and paste this template into your checkout flow:
{{# You should really load this in your <head> if possible. #}}
<script src="https://js.stripe.com/v3/"></script>
<form id="payment-form">
<div id="payment-element" class="mb-4">
<!--Stripe.js injects the Payment Element-->
</div>
<button id="submit" class="bg-blue-400 text-white uppercase font-semibold px-4 py-2">Pay Now</button>
<div id="payment-message" class="hidden"></div>
</form>
<script>
// This is a public sample test API key.
// Don’t submit any personally identifiable information in requests made with this key.
// Sign in to see your own test API key embedded in code samples.
const stripe = Stripe("{{ api_key }}");
let elements;
initialize();
document
.querySelector("#payment-form")
.addEventListener("submit", handleSubmit);
// Fetches a payment intent and captures the client secret
async function initialize() {
elements = stripe.elements({ clientSecret: '{{ client_secret }}' });
const paymentElementOptions = {
layout: "accordion",
defaultValues: {
billingDetails: {
name: '{{ cart:customer:name }}',
email: '{{ cart:customer:email }}',
address: {
line1: '{{ cart:billing_address:line_1 }}',
line2: '{{ cart:billing_address:line_2 }}',
city: '{{ cart:billing_address:city }}',
postal_code: '{{ cart:billing_address:postcode }}',
state: '{{ cart:billing_address:state:code }}',
country: '{{ cart:billing_address:country:iso2 }}',
},
},
},
};
const paymentElement = elements.create("payment", paymentElementOptions);
paymentElement.mount("#payment-element");
}
async function handleSubmit(e) {
e.preventDefault();
setLoading(true);
const { error } = await stripe.confirmPayment({
elements,
confirmParams: {
// Make sure to change this to your payment completion page
return_url: "{{ checkout_url }}",
},
});
// This point will only be reached if there is an immediate error when
// confirming the payment. Otherwise, your customer will be redirected to
// your `return_url`. For some payment methods like iDEAL, your customer will
// be redirected to an intermediate site first to authorize the payment, then
// redirected to the `return_url`.
if (error.type === "card_error" || error.type === "validation_error") {
showMessage(error.message);
} else {
showMessage("An unexpected error occurred.");
}
setLoading(false);
}
// ------- UI helpers -------
function showMessage(messageText) {
const messageContainer = document.querySelector("#payment-message");
messageContainer.classList.remove("hidden");
messageContainer.textContent = messageText;
setTimeout(function () {
messageContainer.classList.add("hidden");
messageContainer.textContent = "";
}, 4000);
}
function setLoading(isLoading) {
document.getElementById('submit').disabled = isLoading;
}
</script>
{{# You should really load this in your <head> if possible. #}}
<script src="https://js.stripe.com/v3/"></script>
<form id="payment-form">
<div id="payment-element" class="mb-4">
<!--Stripe.js injects the Payment Element-->
</div>
<button id="submit" class="bg-blue-400 text-white uppercase font-semibold px-4 py-2">Pay Now</button>
<div id="payment-message" class="hidden"></div>
</form>
<script>
// This is a public sample test API key.
// Don’t submit any personally identifiable information in requests made with this key.
// Sign in to see your own test API key embedded in code samples.
const stripe = Stripe("{{ $api_key }}");
let elements;
initialize();
document
.querySelector("#payment-form")
.addEventListener("submit", handleSubmit);
// Fetches a payment intent and captures the client secret
async function initialize() {
elements = stripe.elements({ clientSecret: '{{ $client_secret }}' });
const paymentElementOptions = {
layout: "accordion",
defaultValues: {
billingDetails: {
name: '{{ Statamic::tag('cart:customer:name') }}',
email: '{{ Statamic::tag('cart:customer:email') }}',
address: {
line1: '{{ Statamic::tag('cart:billing_address:line_1') }}',
line2: '{{ Statamic::tag('cart:billing_address:line_2') }}',
city: '{{ Statamic::tag('cart:billing_address:city') }}',
postal_code: '{{ Statamic::tag('cart:billing_address:postcode') }}',
state: '{{ Statamic::tag('cart:billing_address:state:code') }}',
country: '{{ Statamic::tag('cart:billing_address:country:iso2') }}',
},
},
},
};
const paymentElement = elements.create("payment", paymentElementOptions);
paymentElement.mount("#payment-element");
}
async function handleSubmit(e) {
e.preventDefault();
setLoading(true);
const { error } = await stripe.confirmPayment({
elements,
confirmParams: {
// Make sure to change this to your payment completion page
return_url: "{{ $checkout_url }}",
},
});
// This point will only be reached if there is an immediate error when
// confirming the payment. Otherwise, your customer will be redirected to // your `return_url`. For some payment methods like iDEAL, your customer will // be redirected to an intermediate site first to authorize the payment, then // redirected to the `return_url`. if (error.type === "card_error" || error.type === "validation_error") {
showMessage(error.message);
} else {
showMessage("An unexpected error occurred.");
}
setLoading(false);
}
// ------- UI helpers -------
function showMessage(messageText) {
const messageContainer = document.querySelector("#payment-message");
messageContainer.classList.remove("hidden");
messageContainer.textContent = messageText;
setTimeout(function () {
messageContainer.classList.add("hidden");
messageContainer.textContent = "";
}, 4000);
}
function setLoading(isLoading) {
document.getElementById('submit').disabled = isLoading;
}
</script>
We're using Stripe's Payment Elements implementation, which allows customers to choose from any of the payment methods enabled in your account.
You may wish to disable the "Link" payment method, as it can sometimes get in the way. It can be disabled from the Payment Methods settings page in the Stripe Dashboard.
If possible, you should move Stripe's JS into the <head>.
Webhooks
Cargo relies on webhooks sent by Stripe to capture payments, update order statuses and handle refunds.
The easiest way to receive webhooks locally is by using the Stripe CLI. Once you've got it setup, all you need to do is run this command any time you want to listen for events:
stripe listen --forward-to https://your-store.test/!/cargo/payments/stripe/webhook --skip-verify
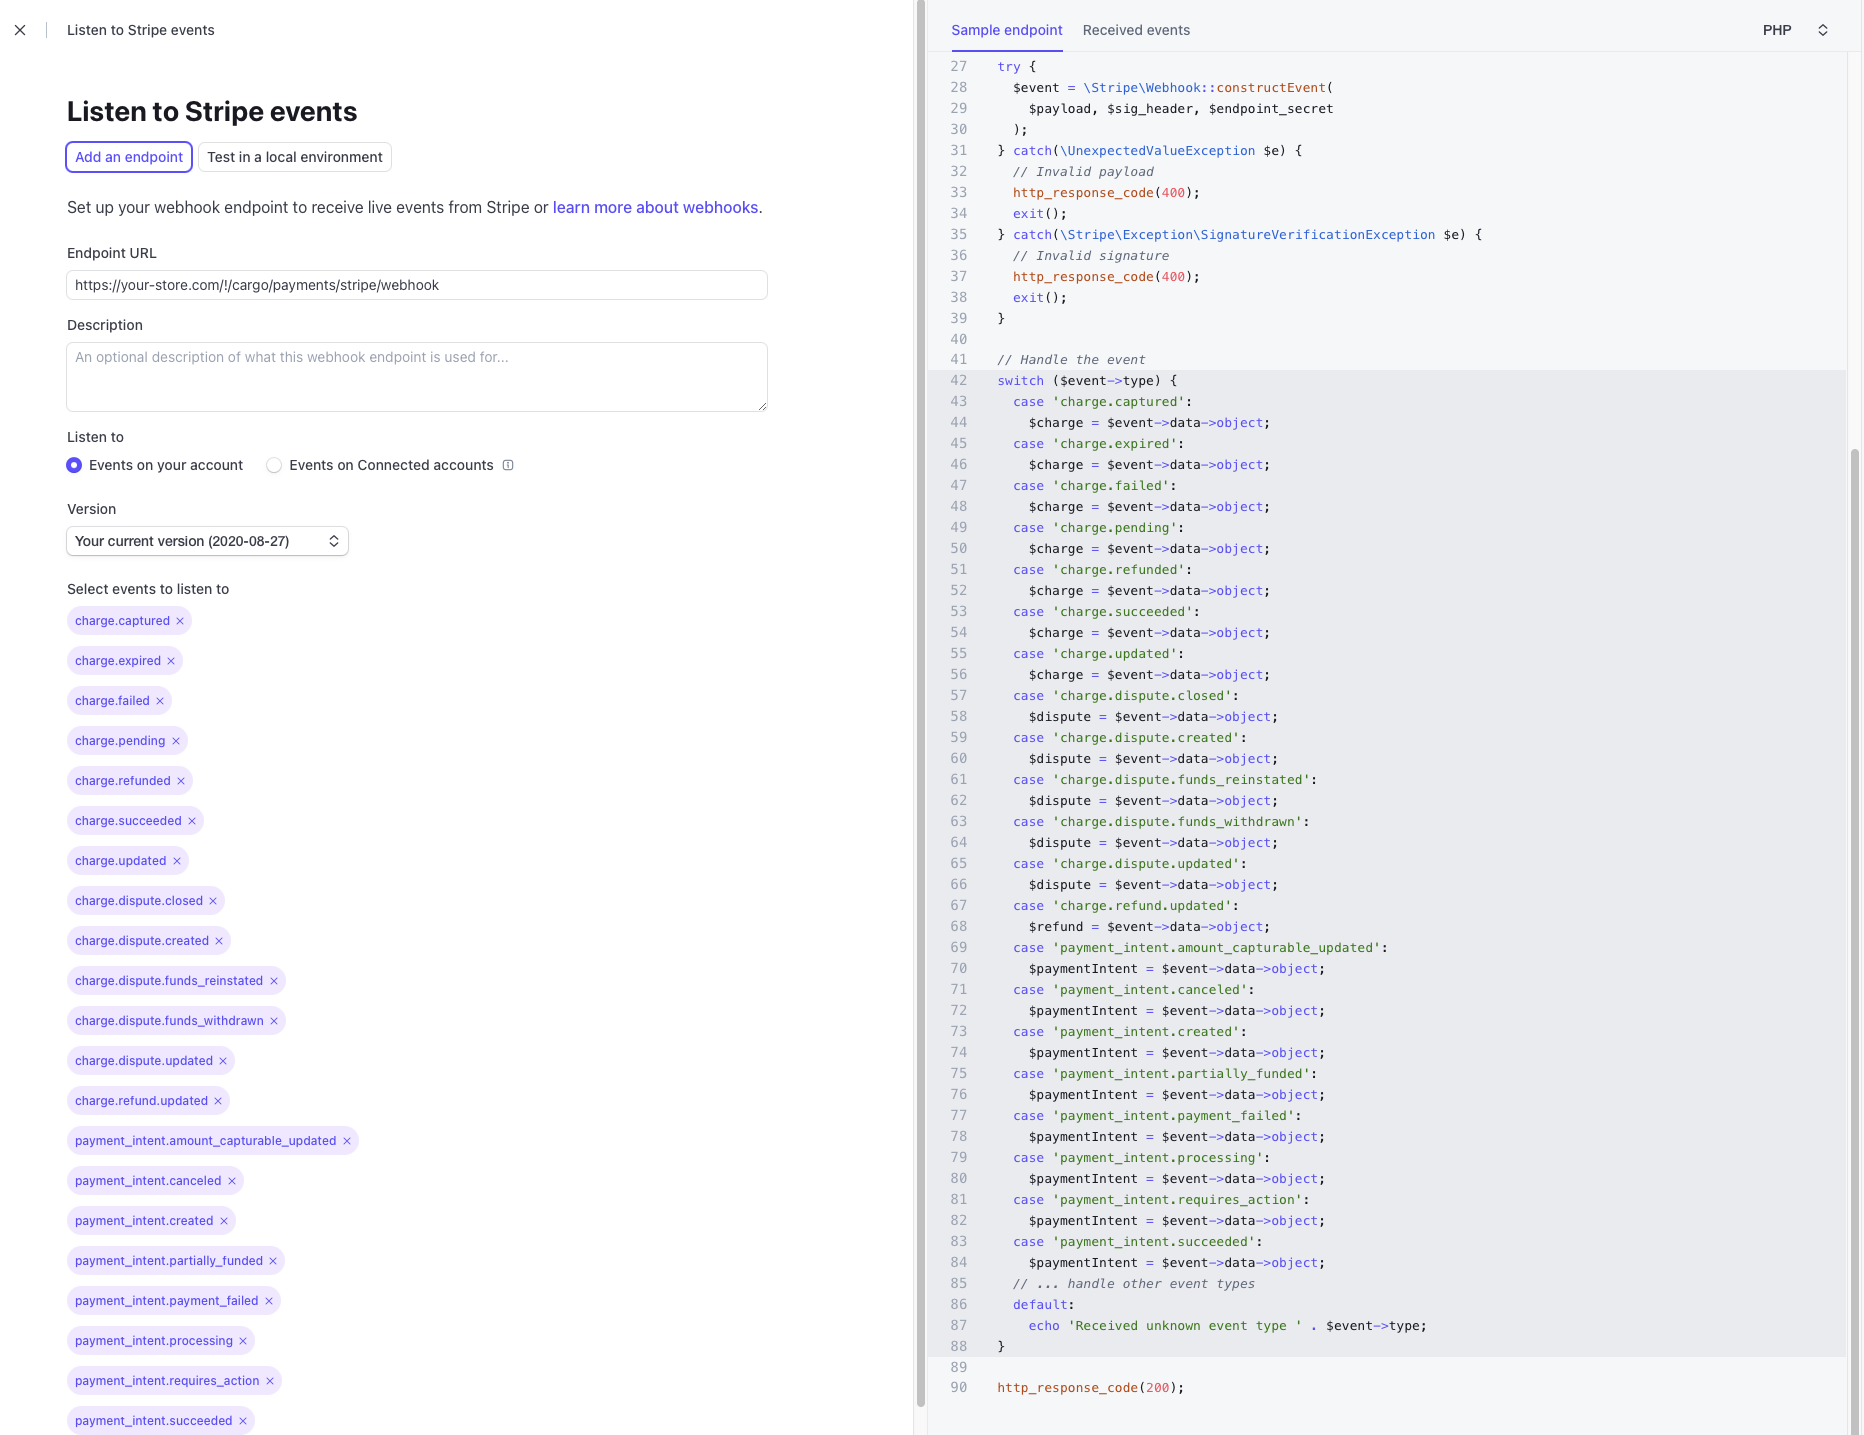
When you set up your site on production, you should create a webhook in the Stripe Dashboard.
It should point to https://your-store.com/!/cargo/payments/stripe/webhook, and listen for any charge or payment intent events:
For additional security, we recommend copying the "Webhook Secret" into your .env file:
STRIPE_WEBHOOK_SECRET=whsec_...
Payment Description
By default, the payment description will be Order #1234. If necessary, you can customize this by calling the Stripe::paymentDescription() hook in your AppServiceProvider:
use DuncanMcClean\Cargo\Contracts\Orders\Order;
use DuncanMcClean\Cargo\Payments\Gateways\Stripe;
Stripe::paymentDescription(function (Order $order) {
return "Acme Store - {$order->orderNumber()}";
});
Mollie
Payment Form
You don't need to copy this into your project if you're using the built-in checkout flow, as you'll already have it.
Since the transaction happens on Mollie's website, all we need to do is take the customer there, which makes the payment form incredibly simple:
<a href="{{ checkout_url }}">
Checkout with Mollie
</a>
<a href="{{ $checkout_url }}">
Checkout with Mollie
</a>
Webhooks
Cargo relies on webhooks sent by Mollie in order to update order statuses and handle refunds.
When the payment gateway creates the payment in Mollie, it automatically configures the webhook URL for us.
However, when you're developing locally, your local development site won't be accessible by Mollie in order for it to send webhook requests.
You can workaround this by setting up a tunneling service, like Expose or Ngrok, which will provide you with a publicly accessible URL that Mollie can use to talk with your local dev site.
You will need to update the APP_URL key in your .env while your tunnel is active, so the gateway points towards the tunnel.
Payment Description
By default, the payment description will be Order #1234. If necessary, you can customize this by calling the Mollie::paymentDescription() hook in your AppServiceProvider:
use DuncanMcClean\Cargo\Contracts\Orders\Order;
use DuncanMcClean\Cargo\Payments\Gateways\Mollie;
Mollie::paymentDescription(function (Order $order) {
return "Acme Store - {$order->orderNumber()}";
});
Pay on delivery
In some markets, you may wish to offer "Pay on delivery" instead of requiring payment upfront. To do this, simply add the built-in pay_on_delivery payment gateway to your gateways array:
// config/statamic/cargo.php
'gateways' => [
+ 'pay_on_delivery' => [], ],
The "Pay on delivery" gateway will only be shown to customers when their selected shipping option supports it.
When orders are placed using "Pay on delivery":
- They'll start with a status of "Payment Pending"
- When you ship the order, update the status to "Shipped"
- Once the delivery company has collected payment and confirmed delivery, update the status to "Payment Received"
Depending on the delivery company, you may be able to automate the final status update via a custom API integration.
Email Notifications
Cargo will add an event listener to your AppServiceProvider during the install process. The listener is responsible for sending the "Order Confirmation" email.
It usually listens for the OrderPaymentReceived event, dispatched when an order's payment is successful. You may want to listen to the OrderCreated instead so the email is sent when the order is created.
-use DuncanMcClean\Cargo\Events\OrderPaymentReceived; +use DuncanMcClean\Cargo\Events\OrderCreated;
-Event::listen(OrderPaymentReceived::class, function ($event) { +Event::listen(OrderCreated::class, function ($event) { Mail::to($event->order->customer())
->locale($event->order->site()->shortLocale())
->send(new OrderConfirmation($event->order));
});
Payment Form
You don't need to copy this into your project if you're using the built-in checkout flow, as you'll already have it.
To use the Pay on delivery gateway, copy and paste this template into your checkout flow:
<form x-data="{ busy: false }" action="{{ checkout_url }}" method="POST" @submit="busy = true">
<button>Place Order</button>
</form>
<form x-data="{ busy: false }" action="{{ $checkout_url }}" method="POST" @submit="busy = true">
<button>Place Order</button>
</form>
Build your own
If you need to use a payment processor that Cargo doesn't support out-of-the-box, it's pretty easy to build your own payment gateway.
To get started, run the following command:
php please make:payment-gateway FooPay
This will create a file in app/PaymentMethods which looks like this:
<?php
namespace App\PaymentGateways;
use DuncanMcClean\Cargo\Contracts\Cart\Cart;
use DuncanMcClean\Cargo\Contracts\Orders\Order;
use DuncanMcClean\Cargo\Payments\Gateways\PaymentGateway;
use Illuminate\Http\Request;
use Illuminate\Http\Response;
class FooPay extends PaymentGateway
{
public function setup(Cart $cart): array
{
return [];
}
public function process(Order $order): void
{
//
}
public function capture(Order $order): void
{
//
}
public function cancel(Cart $cart): void
{
//
}
public function webhook(Request $request): Response
{
return response();
}
public function refund(Order $order, int $amount): void
{
// ...
$order->set('amount_refunded', $amount)->save();
}
}
Cargo will automatically register any payment gateways in the app/PaymentGateways directory.
If your payment gateways live elsewhere, or you're inside an addon, you will need to register it manually in a service provider:
// app/Providers/AppServiceProvider.php
use App\PaymentGateways\FooPay;
public function boot(): void
{
FooPay::register();
}
Methods
| Method | Description |
|---|---|
setup |
This method is called by the {{ payment_gateways }} tag (or its AJAX equivalent).You should do whatever you need to in order to create the "payment". Anything you return from this method will be available on the checkout form. You shouldn't return any sensitive API keys from this method, as they could be exposed via the AJAX endpoint. |
process |
This method is called when the payment gateway's "callback URL" is hit. |
capture |
When your payment gateway supports "authorise and capture", you can call this method in your webhook code to capture the payment. This method can be left blank when "authorise and capture" isn't supported. |
cancel |
This method is called when the payment gateway's "callback URL" is hit, but the payment needs to be cancelled. Payments may need to be cancelled when a coupon is invalid, there's not enough stock to fulfil the order, or customer/address information is missing from the order. |
webhook |
This method is called when a webhook request is received. When possible, you should verify that the request is genuine before taking action (eg. by verifying headers). |
refund |
This method is called when a refund is initiated in the Control Panel. |
fieldtypeDetails |
The fieldtypeDetails method allows you to display information about the payment in the Control Panel. For example: payment ID, card brand, etc. You can find an example of it being used in the built-in Stripe gateway. |
Notes
- Every payment gateway has a unique callback URL...
- You can either submit to this URL using a
<form>tag or use it as a redirect/callback URL, depending on your needs.
- You can either submit to this URL using a
- Every payment gateway has a unique webhook URL...
- It takes the format of
/!/cargo/payments/gateway_handle/webhook.
- It takes the format of
- Where possible, if your gateway supports it, we recommend separating the authorisation and capture steps of the payment.
- The callback URL will usually handle order creation. However, for various reasons, this may not always happen (eg. customer closes the tab, or loses internet). You should call
$this->createOrderFromCart($cart)in yourwebhookmethod if you can't find an order. - If you're in need of inspiration, feel free to look at Cargo's Stripe and Mollie payment gateways.