Store
Products
Products are just entries, with a few additional fields (Price / Type / Tax Class).
Most of the time, products will live in a "Products" collection, however, you're more than welcome to use a different collection, or even configure multiple product collections.
// config/statamic/cargo.php
'products' => [
'collections' => ['products'],
],
Digital Products
By default, Cargo assumes that all products are physical products. However, if you're planning to sell digital goods, like downloadable files, you should enable the digital_products option in the cargo.php config file:
// config/statamic/cargo.php
'products' => [
'digital_products' => true,
],
Once enabled, Cargo will add a "Type" toggle to your product entries, allowing you to determine if a product is "Physical" or "Digital". Shipping costs aren't calculated for digital products.
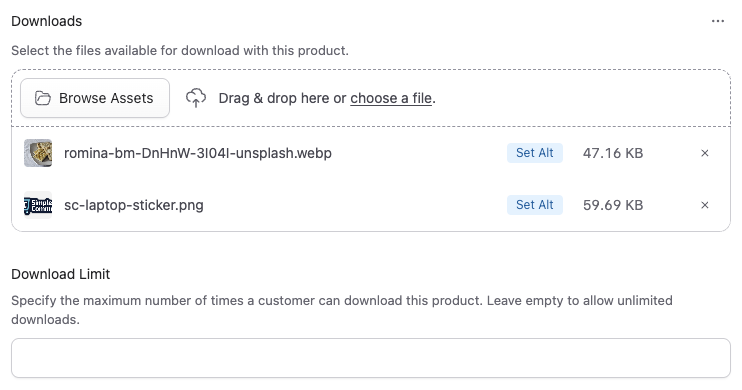
Downloads
When you mark a product as digital, a "Downloads" field will appear on the product publish form, allowing you to specify which assets should be downloadable when an order is completed.
You can also specify a limit on how many times a customer can download the files.
After an order has been created, you may loop through the order's downloads like this:
{{ downloads }}
<a href="{{ download_url }}">Download {{ product:title }}</a>
{{ /downloads }}
@foreach($downloads as $download)
<a href="{{ $download['download_url'] }}">Download {{ $download['product']['title'] }}</a>
@endforeach
Inventory / Stock Tracking
If you want to keep track of inventory, add a "Stock" field to your collection blueprint and specify a stock count on each product.
Then, whenever an order is created, Cargo will update the product stock field.
Cargo will also dispatch events when a product is out of stock, and when a product is running low on stock. You can configure the "low on stock" threshold in the cargo.php config file:
// config/statamic/cargo.php
'products' => [
'low_stock_threshold' => 5,
],
If you're using product variants, you should add "Stock" as a variant options field.
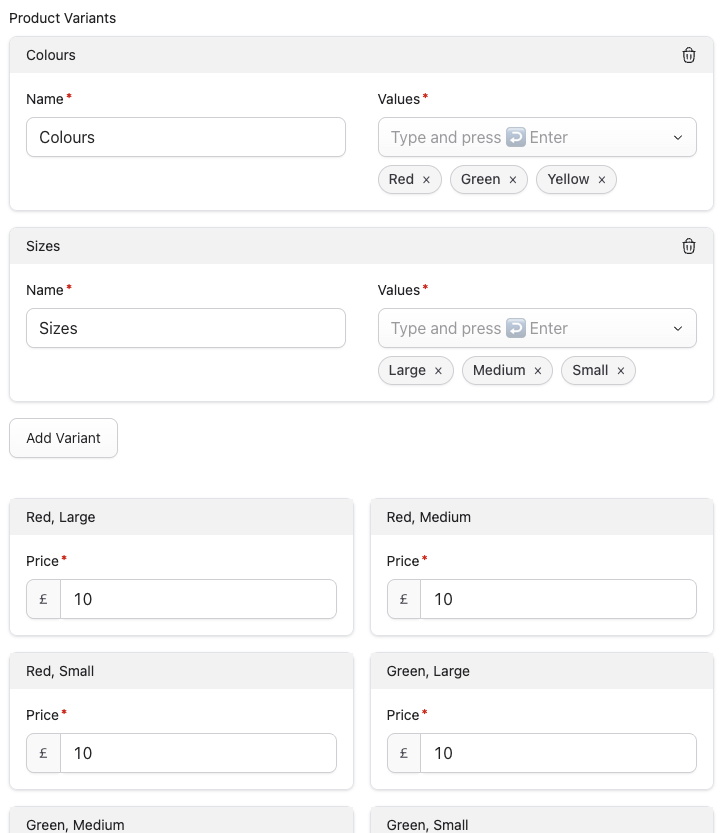
Product Variants
Cargo supports product variants, allowing you to specify different groups of options (like size, colours, etc).
From those options, it'll create a matrix of all the various combinations and allow you to define the price, stock levels, and any other fields for each item.
This is what it looks like in the Control Panel:
To use product variants...
- Remove the "Price" field from the collection blueprint
- You may want to create a separate blueprint for variant products, if you need to support non-variant products too.
- Add a new "Product Variants" field to your collection blueprint
- Make sure the field's handle is
product_variants, otherwise it won't get picked up. - If needed, you can configure "option fields" so you can define things like SKUs or product photos on each option.
- Make sure the field's handle is
- Now, you may configure product variants.
Templating
You can loop through variant options like this:
{{ product_variants:options }}
{{ variant }} - {{ price }}
{{ /product_variants:options }}
@foreach($product_variants['options'] as $option)
{{ $option['variant'] }} - {{ $option['price'] }}
@endforeach
When adding a variant to the cart, make sure to include a variant input:
{{ cart:add }}
<input type="hidden" name="product" value="{{ page:id }}">
<input type="hidden" name="variant" value="chosen-variant-key">
<button>Add to cart</button>
{{ /cart:add }}
<s:cart:add>
<input type="hidden" name="product" value="{{ $page['id'] }}">
<input type="hidden" name="variant" value="chosen-variant-key">
<button>Add to cart</button>
</s:cart:add>
Prerequisite Products
Cargo supports prerequisite products, allowing you to require customers to have purchased a specific product before they purchase another. Useful if you're selling upgrades or add-ons.
To configure a prerequisite product, add a "Prerequisite Product" field to your product blueprint:
- Add an "Entries" field to the product blueprint with the handle
prerequisite_product - Set "Max Items" to
1 - Set "Collections" to your product collection(s)
When a customer attempts to add a product with a prerequisite to their cart:
- Guest customers will see an error message asking them to login or register first.
- Logged in customers who haven't purchased the prerequisite product will see an error message indicating which product they need to purchase first.
- Logged in customers who have previously purchased the prerequisite product can add the product to their cart normally.
The prerequisite check looks at the customer's completed orders to determine if they've purchased the required product. The product must exist in at least one of their past orders.